


|
||
| Release 4.0 | ||
Adding a Render Job
In order to add a render job you need to open the render job window (menu item: Windows/Render Jobs). You'll see the following window:
There are a few buttons in it:
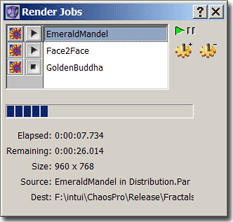
 This button lets you start/pause the current render job. Currently there is no render job, thus the icon is grey.
 This button lets you add a render job. As soon as you click onto it, another window will appear which lets you define your new render job.
 If you click onto this button then the current render job will be deleted.
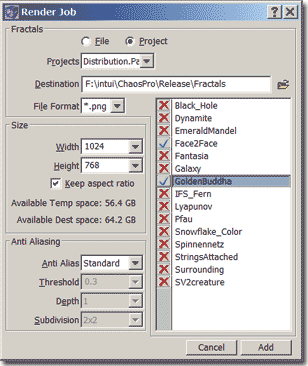 |
Now what can you do with it? In short: You select one or several fractals, select the file format and destination, choose the fractal size, choose anti aliasing settings and click the "Add" button.
So now do the following:
- Make sure that "Project" is selected. This lets you choose a fractal from a project which is currently loaded into ChaosPro.
- From the list of projects select one which has an interesting fractal. Normally the currently selected fractal (and the project) is pre-selected.
- Now choose the destination, i.e. the folder on your harddisk into which the rendered fractal image should be saved.
- Then choose a file format, currently PNG or JPG are supported. The fractal image will be saved in this file format.
- Now select the fractal which you want to render. If you like you can select several (or all) fractals.
- Choose a size.
- Now choose the anti aliasing settings. See Anti Aliasing for more information.
- And at the end, press the "Add" button to create a new render job for each fractal which you have selected.
And now the render job window will look as follows (well, at least similarily):
 |